It’s Saturday morning, and you’re staring into your closet, a sundress calling your name. But a quick glance in the mirror reveals a different story – a pale complexion that screams “indoors.” Sound familiar? We all crave that sun-kissed glow, especially when summer rolls around or a special event is on the horizon. And while basking in the sun might seem tempting, we all know the risks. So, how do you achieve a beautiful, natural-looking tan without damaging your skin?
That’s where we come in! We’ve done the research to bring you the ultimate guide to the best self tanners on the market. Forget streaky orange disasters and say hello to a flawless, believable tan. Whether you’re a seasoned self-tanning pro or a complete beginner, our reviews and buying guide will help you find the perfect product to achieve your desired shade, leaving you feeling confident and radiant. Get ready to glow!
We will review the best self tanners later in this article. But before that, take a look at some relevant products on Amazon:


Last update on 2026-02-13 / Affiliate links / #CommissionsEarned / Images from Amazon Product Advertising API
Chasing the Sun-Kissed Glow: Your Guide to Self-Tanning Success
Let’s be honest, who doesn’t love a little bit of a glow? That feeling when your skin just looks healthier, more radiant, and ready for anything. But the sun? Well, it’s not always our friend. Premature aging, sunburns, and the risk of skin cancer are all serious concerns. That’s where the magic of self-tanning comes in! We can achieve that coveted bronze look without the harmful UV rays. According to the Skin Cancer Foundation, self-tanners are a safe alternative to sunbathing because they don’t increase your risk of skin cancer.
But with so many options out there, finding the best self tanners can feel overwhelming. From mousses and lotions to sprays and drops, the sheer variety can leave you wondering where to even begin. Don’t worry, though! We’re here to break it all down, offering you a friendly guide to navigating the world of sunless tanning. Think of it as having a knowledgeable friend whispering the secrets to a flawless faux glow.
The good news is that self-tanning technology has come a long way. Remember those days of streaky orange results? Thankfully, those are largely a thing of the past. Many formulas now include moisturizing ingredients and color-correcting technology to create a more natural-looking tan. And with an estimated market size of over $1 billion globally (as of 2023), it’s clear that people are embracing the self-tanning trend.
So, whether you’re a self-tanning newbie or a seasoned pro looking for an upgrade, we’ve got you covered. Get ready to discover the best self tanners that will leave you looking and feeling amazing, all while keeping your skin healthy and happy. Let’s dive in and find your perfect sunless match!
The Best Self Tanners
St. Tropez Self Tan Classic Bronzing Mousse
This self-tanner is a long-time favorite, and for good reason. It delivers a natural-looking, golden tan that’s buildable, so you can control the depth of color. The lightweight mousse formula is easy to apply and dries quickly, minimizing the risk of streaks or patches. Plus, it has a guide color so you can see exactly where you’ve applied it.
The scent is a definite plus, it’s much more pleasant than many other self-tanners. It also fades evenly, preventing that dreaded reptile-skin effect. While it might be a little pricier than some options, the quality and consistent results make it worth the investment for a flawless, sun-kissed glow.
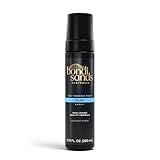
Bondi Sands Self Tanning Foam
If you’re after a deep, dark tan that looks like you’ve spent a week on Bondi Beach, this foam is a great choice. The formula is enriched with aloe vera and coconut to hydrate your skin while it tans, leaving it feeling soft and smooth. It’s also known for its quick-drying formula, which is a major bonus when you’re trying to avoid transfer onto clothes and sheets.
Application is easy with a tanning mitt, and the guide color helps you achieve even coverage. The color develops within a few hours, leaving you with a rich, bronze tan. This is a fantastic option for those who want a noticeable tan that lasts, just be sure to exfoliate well beforehand for the best results!
Loving Tan Deluxe Bronzing Mousse
This mousse is a cult favorite for its ability to create a deep, natural-looking tan with minimal effort. Its instant color guide makes application a breeze, and the formula is infused with antioxidants to nourish and protect the skin. The color develops quickly, giving you a beautiful bronze glow in just a few hours.
Many users rave about the long-lasting results and the fact that it fades evenly. While it might be on the pricier side, the quality and the ability to achieve a salon-worthy tan at home make it a worthwhile splurge. Just be sure to moisturize daily to prolong your tan and keep your skin looking its best.
Tan-Luxe The Body Illuminating Self-Tan Drops
These self-tan drops are a game-changer for anyone who wants a customizable tan. Simply add a few drops to your favorite moisturizer, mix well, and apply evenly to your skin. The more drops you add, the deeper your tan will be, giving you complete control over your desired shade.
The formula is hydrating and lightweight, leaving your skin feeling soft and smooth. It’s also fragrance-free, making it a great option for those with sensitive skin. These drops are perfect for maintaining a year-round glow or building a tan gradually, without the commitment of a full-body self-tanner.
Isle of Paradise Self Tanning Water
This self-tanning water is an innovative and fuss-free way to achieve a natural-looking tan. The clear formula means no guide color and no risk of transfer onto clothes or sheets. Simply spritz it onto your skin and blend with a tanning mitt for an even application.
The water is infused with color-correcting actives to neutralize redness and create a flawless, streak-free tan. It’s also incredibly hydrating, leaving your skin feeling refreshed and moisturized. This is a fantastic option for those who prefer a lightweight, low-maintenance self-tanner that delivers a subtle, natural-looking glow.
Why Do People Need to Buy Self Tanners?
Let’s be honest, who doesn’t love that sun-kissed glow? That feeling of looking healthier, more radiant, and just a little bit more confident? But exposing ourselves to the sun’s harmful UV rays to achieve that tan comes with significant risks, like premature aging and the potential for skin cancer. Imagine planning that perfect summer vacation, only to spend it slathered in sunscreen and hiding under an umbrella, sacrificing that beautiful bronze look. That’s where self tanners come in as a game-changer!
The best self tanners offer a safe and convenient way to achieve that desirable tan without any of the sun damage. They work by reacting with the amino acids in the outermost layer of your skin, creating a temporary color change that mimics a natural tan. No more worrying about sunburns, wrinkles, or long-term skin health issues! Picture yourself heading to a party, feeling fabulous in your outfit, and knowing that your glowing tan is courtesy of a bottle, not harmful UV exposure.
Think about the versatility! Whether you’re prepping for a special occasion, want to boost your confidence before a beach trip, or simply want to brighten up a dull winter complexion, self tanners offer a customizable solution. You can choose the level of darkness you desire, from a subtle sun-kissed radiance to a deep bronze tan. And with so many different formats available – lotions, mousses, sprays, and even drops to add to your moisturizer – there’s a perfect self tanner out there for everyone’s preference and skill level.
So, ditch the tanning beds and embrace the smart, safe, and beautiful world of self tanners! With the best self tanners, you can achieve that enviable glow without compromising your skin’s health. It’s an investment in your confidence, your appearance, and most importantly, your well-being. Go ahead, treat yourself to that sun-kissed look you’ve always wanted – guilt-free and radiant!
Achieving a Natural-Looking Tan: Prepping Your Skin
Let’s be real, no one wants to look like they’ve been dunked in a vat of orange juice. The key to a believable, sun-kissed glow starts long before you even crack open that self-tanner bottle. Think of your skin as a canvas; a smooth, clean surface is essential for even color distribution and a flawless finish. So, before you dive in, consider this your pre-tan pep talk.
Exfoliation is your best friend. A day or two before you plan to tan, gently exfoliate your entire body. This removes dead skin cells, preventing the tanner from clinging to dry patches and creating a splotchy effect. Imagine you’re going on a beach vacation, and you want to show off your freshly tanned legs, make sure that you give them a good scrub a couple of days before tanning.
Shaving or waxing should also be done at least 24 hours before applying self-tanner. This allows your pores to close, preventing those dreaded “strawberry legs” where the tanner settles into your open pores and creates dark spots. Think of it like this: planning ahead ensures you’re rocking that sun-kissed look on the beach, not regretting a hasty shave.
Finally, moisturize! Focus on dry areas like elbows, knees, ankles, and hands. Lightly moisturizing these areas creates a barrier, preventing them from absorbing too much tanner and becoming overly dark. Remember, a little hydration goes a long way in achieving a natural, even tan.
Application Techniques: Avoiding Common Mistakes
Okay, you’ve prepped your skin like a pro. Now comes the actual application. This is where precision and technique come into play. The goal? To avoid those telltale signs of a self-tan gone wrong: streaks, dark patches, and that dreaded orange hue. Let’s dive into some tips and tricks.
Start with a tanning mitt. Seriously, ditch the bare hands! A mitt provides a smooth, even application and prevents your palms from turning a bizarre shade of orange. Imagine explaining to your boss why your hands are glowing a radioactive color after trying a new self-tanner on the weekend. A mitt is your saving grace.
Apply the tanner in sections, working in circular motions. This helps ensure even coverage and prevents streaks. Think of it like painting a wall: you wouldn’t just slap the paint on haphazardly, would you? Take your time, work in sections, and blend, blend, blend.
Don’t forget those tricky spots! Areas like your ankles, knees, and elbows tend to absorb more tanner. Use a light hand when applying to these areas or dilute the tanner with a bit of moisturizer. Visualise wanting to wear your favourite mini skirt out and tanning just your legs, so that they don’t have darker knees than the rest of your body!
Finally, remember that less is more. Start with a light layer of tanner and build up the color gradually. You can always add more, but it’s much harder to remove excess tanner. It’s better to wake up slightly lighter than expected and add another layer than to sport a deep, unnatural tan that screams “self-tanner disaster.”
Maintaining Your Tan: Extending the Glow
You’ve achieved the perfect tan! Now, the challenge is keeping it looking fresh and radiant for as long as possible. Self-tanners are notorious for fading unevenly, leaving you with a patchy, lackluster appearance. But fear not, with a few simple steps, you can extend your glow and keep that sun-kissed look alive.
Moisturize, moisturize, moisturize! Hydrated skin is happy skin, and happy skin holds onto a tan longer. Apply a generous layer of moisturizer twice a day, especially after showering. Imagine you are going out for a party in a couple of weeks and you want to maintain your sun-kissed tan for as long as possible, then using moisturiser will be your bestie!
Avoid harsh soaps and exfoliants. These can strip away your tan, causing it to fade quickly and unevenly. Opt for gentle, moisturizing body washes and limit exfoliation to once a week. You do not want to have a tan for a few days, only for it to fade after a couple of showers.
Consider a tan extender. These products contain a small amount of self-tanner, helping to prolong your existing tan and prevent it from fading. Apply it every few days to keep your color looking vibrant. Just like the base and top coat that you use for your nails, tanning extender helps with locking in the colour for the long run.
Stay hydrated from the inside out! Drinking plenty of water keeps your skin hydrated and helps your tan last longer. So, keep that water bottle handy and sip throughout the day. It is one thing to apply lotions on the outside, but it is as important to hydrate the skin from the inside.
Choosing the Right Formula: Creams, Mousses, and Sprays
Navigating the world of self-tanners can feel overwhelming. With so many different formulas available – creams, mousses, sprays, lotions – how do you choose the right one for your skin type and application preference? Each type offers unique benefits and drawbacks, so let’s break it down to help you find your perfect match.
Creams are generally the most moisturizing option. They’re great for dry skin and can provide a gradual, natural-looking tan. Think of it as a luxurious body lotion that also happens to give you a sun-kissed glow. If you have eczema or dry skin, imagine going to the beach and returning with dry, flaky skin! But with a cream, you will return with sun-kissed skin and well-moisturized skin.
Mousses are lightweight and easy to apply. They tend to dry quickly, making them a good option for those who are short on time. The airy texture also makes them less likely to clog pores. Imagine you have a big event the next day, such as a wedding, and you want to look good in the photos but you are short on time, then self-tanning mousse will be your best friend!
Sprays are ideal for hard-to-reach areas like your back. They provide an even, streak-free application when used correctly. However, they can be a bit messy, so be sure to apply them in a well-ventilated area. Having a spray is beneficial because it allows you to easily reach certain areas of the body, especially if you live alone and no one can help you reach the back.
Lotions are a classic choice. They’re easy to apply, provide a gradual tan, and are often infused with moisturizing ingredients. The versatility of lotions makes them a great option for beginners. Just like applying lotion to the skin, self-tanning lotions are as easy to apply!
Your Guide to Achieving a Sun-Kissed Glow: Finding the Best Self Tanners
Hey there, sun-kissed seeker! Dreaming of that golden glow without the harmful rays? You’re in the right place! Navigating the world of self-tanners can feel a little overwhelming, but don’t worry, I’m here to be your guide. We’ll walk through everything you need to consider to find the best self tanners for your skin tone, lifestyle, and desired level of bronzed perfection.
Forget orange streaks and questionable smells! This guide will help you confidently choose a product that leaves you looking naturally radiant and feeling fabulous. Let’s dive in and unlock the secrets to a flawless, faux tan!
1. Understanding Your Skin Tone
Okay, first things first: knowing your skin tone is crucial for achieving a natural-looking tan. Just like with foundation, there’s no one-size-fits-all when it comes to self-tanner. Consider whether you typically burn easily or tan well in the sun. Are you fair, medium, olive, or dark-skinned? This knowledge will help you select the right shade intensity for your skin.
Think of it like this: if you’re naturally very fair, jumping straight to a super dark self-tanner might result in an unnatural, orange-tinged tan. Instead, opt for a lighter shade and gradually build the color with multiple applications. On the other hand, if you have a deeper skin tone, a light tanner might barely show up. Selecting a tanner specifically formulated for medium to dark skin will give you the best results.
2. Choosing the Right Formulation
From lotions and mousses to sprays and wipes, the world of self-tanners offers a dizzying array of formulations. Each has its own pros and cons, so think about what best suits your application style and skin type. Do you prefer a quick and easy application or are you happy to spend a little more time for a deeper, longer-lasting tan?
Lotions are great for dry skin as they provide hydration while tanning. Mousses are lightweight and tend to dry quickly, making them a popular choice for those who are short on time. Sprays offer an even, streak-free application but can be a bit messy. Wipes are convenient for touch-ups or tanning smaller areas. Figuring out which application method you prefer can drastically improve your tanning experience and help you narrow down your search for the best self tanners.
3. Considering the Ingredients
Pay close attention to the ingredients list when choosing your self-tanner. Look for formulas that are free of harsh chemicals and loaded with skin-loving ingredients like hyaluronic acid, aloe vera, and vitamin E. These ingredients will help keep your skin hydrated and prevent it from drying out, which can lead to patchy tanning.
Conversely, be mindful of ingredients you might be sensitive to. Some self-tanners contain fragrances or dyes that can irritate sensitive skin. If you have allergies, always do a patch test on a small area of skin before applying the tanner all over your body. Reading the ingredient list is key to finding a self-tanner that not only gives you a beautiful tan but also nourishes your skin. This is especially important for the best self tanners in the market.
4. Assessing the Development Time
Self-tanners come in a range of development times, from express formulas that develop in as little as an hour to gradual tanners that build color over several days. Consider how much time you’re willing to invest in your tan. Are you looking for a quick fix before a big event or are you happy to build a subtle glow over time?
Express tanners are perfect for last-minute plans, but they require careful monitoring to avoid getting too dark. Gradual tanners offer more control and are ideal for maintaining a tan or building a subtle sun-kissed look. They’re also less prone to streaks and unevenness. Choose a development time that fits your schedule and desired level of intensity.
5. Evaluating the Scent
Let’s be honest, the scent of self-tanner can be a deal-breaker for some. Many self-tanners have that characteristic DHA odor, which isn’t always the most pleasant. Luckily, many brands have worked hard to mask this scent with pleasant fragrances.
Look for self-tanners that are infused with fruity, floral, or tropical scents. Alternatively, you can opt for an unscented formula. Reading reviews can give you a good idea of how strong and pleasant the scent is. Finding a self-tanner that smells good (or at least doesn’t smell bad) can make the whole tanning experience much more enjoyable. Who wants to walk around smelling like a chemistry lab when you could smell like a tropical vacation?
6. Checking for Transfer Resistance
Nobody wants to wake up with a tan transferred onto their sheets or clothes! Look for self-tanners that are formulated to minimize transfer. These formulas typically dry quickly and are less likely to rub off onto fabrics.
Reading reviews can be helpful in determining how transfer-resistant a self-tanner is. Look for comments about whether the tanner stained clothing or bedding. It’s also a good idea to wear loose, dark clothing after applying self-tanner and avoid sweating or showering for several hours to allow the tan to fully develop. Minimizing transfer is essential for a hassle-free tanning experience and finding the best self tanners that won’t ruin your favorite clothes.
7. Reading Reviews and Seeking Recommendations
Before making a purchase, take the time to read reviews and seek recommendations from friends or online communities. Reviews can provide valuable insights into the performance of a self-tanner, including its ease of application, color payoff, longevity, and potential for streaking.
Pay attention to reviews from people with similar skin tones and concerns as you. What works well for one person might not work as well for another. Don’t be afraid to ask for recommendations on social media or in online forums dedicated to beauty and skincare. Hearing about other people’s experiences can help you make an informed decision and avoid wasting money on products that don’t live up to the hype. Finding the best self tanners often relies on the wisdom of the crowd!
Frequently Asked Questions
What’s the best way to prep my skin before using a self-tanner?
Prepping your skin is key for a flawless, streak-free tan! Think of it like preparing a canvas before painting. Start with exfoliation, which will slough off any dead skin cells that could lead to uneven color. A gentle scrub or exfoliating mitt in the shower works wonders. Pay extra attention to areas like your knees, elbows, and ankles, as these tend to be drier.
Next, make sure your skin is clean and dry before applying the self-tanner. Avoid using any lotions, oils, or deodorants right before, as these can create a barrier and prevent the tanner from absorbing properly. A quick rinse and a thorough pat-down with a towel are all you need for the perfect base.
How do I avoid streaks when applying self-tanner?
Streaks are definitely the bane of any self-tanner’s existence, but they’re totally avoidable! The secret is all in the application. Use a tanning mitt – seriously, these are game-changers. They help distribute the product evenly and prevent those telltale orange hands. Apply the tanner in long, sweeping motions, working one section of your body at a time.
And don’t forget to blend, blend, blend! Pay extra attention to areas like your wrists, ankles, and hairline, where streaks are most likely to occur. Use a damp washcloth or a blending brush to soften any harsh lines. Remember, less is more; you can always add more tanner later if needed.
How long should I leave the self-tanner on before showering?
This depends entirely on the specific product you’re using, so definitely read the instructions on the bottle! Generally, most self-tanners recommend leaving them on for anywhere from 1 to 8 hours. The longer you leave it on, the deeper the tan will develop.
If you’re aiming for a subtle glow, you can shower after a shorter amount of time. But if you want a more noticeable tan, leave it on for the full recommended time. Just be sure to avoid sweating or getting wet during the development period! After showering, pat your skin dry and moisturize to prolong your tan.
Will self-tanner turn me orange?
That dreaded orange hue is a common fear, but it’s usually a result of using a self-tanner with too much DHA (dihydroxyacetone), the active ingredient that darkens the skin. Modern self-tanners are formulated to minimize this risk, especially if you choose a product with a lower DHA concentration for your first try.
Look for self-tanners with color guides or tinted formulas, which can help you see where you’re applying the product and ensure even coverage. Start with a gradual tanning lotion or a mousse with a lighter shade, and gradually build up the color over a few days to avoid overdoing it. Patch test a small area first to see how the product reacts with your skin tone.
How do I make my self-tan last longer?
A good self-tan is something to cherish! To extend its lifespan, focus on keeping your skin hydrated. Moisturize daily, especially after showering. A rich, hydrating lotion will prevent your skin from drying out and flaking, which can cause your tan to fade unevenly.
Avoid harsh soaps or exfoliants, as these can strip away the tan. When showering, use a gentle, moisturizing body wash. Pat your skin dry instead of rubbing it, and avoid prolonged exposure to chlorine or saltwater, as these can also fade your tan faster. You can also use a tan extender lotion every few days to replenish the color.
Can I use self-tanner on my face?
Absolutely! But the skin on your face is more delicate than the skin on your body, so you’ll want to use a product specifically formulated for facial use. These are typically lighter and non-comedogenic, meaning they won’t clog your pores.
Look for gradual tanning lotions or serums designed for the face. Apply a small amount evenly to clean, dry skin, avoiding your eyes and mouth. You can use a cotton pad or your fingertips to blend it in. Remember to wash your hands thoroughly after application! Patch testing is crucial, even more so on your face.
What if I mess up my self-tan?
Don’t panic! We all make mistakes. If you notice streaks or uneven patches, there are ways to fix them. For minor mistakes, try exfoliating the area gently with a scrub or loofah. You can also use a lemon juice and baking soda paste to lighten the color in specific spots.
For more significant errors, a tan-removing product or a mixture of baby oil and lemon juice can help break down the tanner. Apply it to the affected area, let it sit for a few minutes, and then exfoliate. You might need to repeat this process a few times. Remember, it’s better to start fresh than to try and salvage a severely flawed tan.
Final Words
Alright, friend, you’ve journeyed through the world of self-tanning and armed yourself with the knowledge to achieve that radiant glow you’ve been dreaming of. Forget the harmful sun rays and embrace the confidence that comes with healthy, sun-kissed skin! Finding the perfect product might take a little experimenting, but trust us, the results are worth it. Think of it as a self-care adventure, a chance to pamper yourself and unlock your inner bronzed goddess. Go ahead, explore, and discover the magic of the best self tanners for you!
Now, go out there and shine! Don’t be afraid to try something new, to make mistakes, and to ultimately find the perfect shade that makes you feel incredible. Remember, the best tan is the one that makes you feel confident and comfortable in your own skin. Consider this your permission slip to glow-up and show the world your most radiant self. You deserve it!