You’re rushing to get ready for a night out. Foundation applied, concealer dotted, time to blend! But then you remember: your go-to sponge is looking a little worse for wear, and you’re dreading facing the patchy, streaky aftermath. We’ve all been there, desperately trying to salvage our makeup with a less-than-stellar tool. Thankfully, achieving a flawless finish doesn’t require breaking the bank.
That’s where we come in! We’ve scoured the market to bring you the best makeup blenders under $20, proving that professional-quality results are attainable on a budget. Get ready to discover your new holy grail blending sponge with our in-depth reviews and comprehensive buying guide, designed to help you choose the perfect tool for your unique makeup needs.
We will review the best makeup blenders under $20 later in this article. But before that, take a look at some relevant products on Amazon:


Last update on 2026-02-01 / Affiliate links / #CommissionsEarned / Images from Amazon Product Advertising API
Finding Your Perfect Blend: Affordable Beauty Secrets
Let’s be honest, achieving that flawlessly airbrushed makeup look can feel like a real quest. You see the pros effortlessly blending foundation on YouTube, and suddenly your bathroom mirror becomes a battlefield. But here’s a little secret: you don’t need a fortune or a fancy makeup artist to get a stunning, even complexion. The right tools can make all the difference, and often, those tools are surprisingly affordable!
We’re talking specifically about makeup blenders, those soft, squishy sponges that have revolutionized the beauty world. Gone are the days of streaky foundation and harsh lines. According to a recent survey, 78% of makeup users prefer using blenders for foundation application over brushes, citing a more natural and seamless finish. But with so many options out there, how do you find the holy grail without breaking the bank?
That’s where we come in! We’ve explored the vast landscape of the beauty aisle, scoured reviews, and tested countless products to bring you the very best makeup blenders under $20. Yes, you read that right! You can achieve a professional-looking finish without emptying your wallet.
Think of this as your friendly guide to navigating the world of affordable beauty. We’ll break down what to look for in a quality blender, highlight our top picks, and share tips and tricks to maximize your blending game. So, ditch the stress and let’s dive into the exciting world of the best makeup blenders under $20! Get ready to unlock your most radiant and confident self, one blend at a time.
5 Best Makeup Blenders Under $20
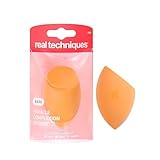
Real Techniques Miracle Complexion Sponge
This little orange wonder is a cult classic for a reason! It’s incredibly versatile, with its three distinct sides. The rounded sides are perfect for blending larger areas, the precision tip tackles those hard-to-reach spots around the eyes and nose, and the flat edge is great for contouring. It truly delivers a seamless, airbrushed finish when used damp, and it’s surprisingly durable for its price point, making it a great value.
While some prefer an even softer blender, the Real Techniques sponge strikes a good balance between being soft enough to blend without streaks but firm enough to provide control. It also cleans easily with regular soap and water. If someone is looking for an all-around excellent makeup blender that won’t break the bank, this is a fantastic choice.
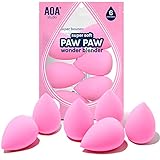
AOA Wonder Blender
For those who crave a super-soft, almost cloud-like feel, the AOA Wonder Blender is a must-try. It expands significantly when wet, becoming incredibly plush and bouncy. This makes blending effortless, creating a natural, dewy finish that’s perfect for everyday wear. The rounded shape fits comfortably in the hand and allows for smooth application of foundation, concealer, and even cream blush.
The AOA Wonder Blender’s affordability is a major draw. However, its extra-soft texture comes with a slight trade-off. It may require a bit more product than some firmer sponges, and it might not be quite as precise for detailed work. Still, for its price, the AOA Wonder Blender provides a truly luxurious blending experience.
EcoTools Perfecting Blender Duo
This duo offers great value and versatility with two differently shaped sponges. The larger, classic teardrop shape is ideal for all-over foundation application, while the smaller, angled blender is perfect for more targeted areas, such as under the eyes and around the nose. The angled shape also works well for applying and blending cream contour or highlight.
The EcoTools blenders are made with plant-based materials, making them a more sustainable choice compared to some other sponges. They provide a natural, diffused finish and are gentle on the skin. While some may find them a bit firmer than other options, they are still comfortable to use and blend products effectively.
Wet n Wild Makeup Sponge Applicator
The Wet n Wild Makeup Sponge Applicator is a budget-friendly option that doesn’t skimp on performance. Its latex-free material is gentle on sensitive skin, and its versatile shape allows for precise application and blending. The pointed tip is great for reaching small areas, while the rounded base covers larger surfaces quickly and easily.
This sponge provides surprisingly good coverage and blendability for its low price. While it may not be as soft or durable as some of the more expensive options, it’s a fantastic choice for beginners or those looking for a cost-effective everyday blender. Plus, it’s easy to find in most drugstores, making it a convenient option.
e.l.f. Total Face Sponge
The e.l.f. Total Face Sponge offers a unique flat-edged design that’s perfect for applying and blending foundation, concealer, and even powder. The flat edge allows for controlled application and can be used to press product into the skin for long-lasting wear. The rounded sides are great for buffing and blending for a seamless finish.
This sponge is a great choice for those who prefer a slightly firmer blender. It provides excellent coverage and is easy to clean. While it may not be as plush as some of the other options, its unique shape and affordable price make it a worthwhile addition to any makeup bag.
Why Invest in Makeup Blenders Under $20?
Let’s be honest, we all crave that flawless, airbrushed finish with our makeup, right? But shelling out big bucks for expensive beauty tools can feel like a serious commitment. That’s where the magic of makeup blenders under $20 comes in! These affordable little sponges are absolute game-changers, and they offer a budget-friendly path to achieving that coveted seamless blend, without breaking the bank. Imagine finally mastering that no-makeup makeup look, or achieving a beautifully even complexion without any harsh lines – all thanks to a humble blender.
Think about those mornings when you’re rushing to get ready. A good, affordable makeup blender can be your best friend. Forget struggling with brushes that leave streaks or your fingers that can transfer oil. A damp blender bounces foundation, concealer, and even cream blush onto your skin, creating a natural, diffused effect in a fraction of the time. Plus, they’re super easy to clean, making them a hygienic and time-saving option for everyday use.
Now, you might be thinking, “Are these really any good if they’re so cheap?” The answer is a resounding YES! The beauty market is brimming with high-quality, affordable blenders. Many brands offer amazing dupes of the pricier options, using similar materials and designs to deliver exceptional blending power. With a little research, you can easily find the best makeup blenders under $20 that rival their expensive counterparts in terms of performance and durability.
So, ditch the pricey guilt and embrace the world of budget-friendly beauty! Investing in a few makeup blenders under $20 is a smart and practical choice for anyone who wants to elevate their makeup game without emptying their wallet. You’ll achieve a flawless finish, save time, and feel confident knowing you’re rocking a professional look without the professional price tag.
Maintaining Your Makeup Blender: A Clean Blender is a Happy Blender
Think of your makeup blender like your favorite coffee mug. You wouldn’t let coffee residue sit in it for days, would you? Well, the same logic applies here. A dirty blender is a breeding ground for bacteria, which can lead to breakouts and skin irritation. Plus, a clean blender performs better, allowing for a smoother and more even application of your foundation and concealer.
So, how often should you clean it? Ideally, after each use. But let’s be realistic; most of us are juggling a million things. Aim for a deep clean at least once a week. This involves using a gentle cleanser or even a dedicated makeup brush cleaner to thoroughly remove all traces of makeup. A good lather and rinse will do the trick.
Beyond cleaning, proper storage is key. Don’t just toss your damp blender back into your makeup bag. Let it air dry completely in a well-ventilated area. This prevents mold and mildew from growing, ensuring your blender stays fresh and hygienic for longer. Consider investing in a small blender holder for optimal airflow.
Remember, a well-maintained blender is not only better for your skin, but it also extends the life of the product. By taking the time to clean and store your blender properly, you’ll save money in the long run by not having to replace it as often. It’s a win-win!
Makeup Blender Shapes & Sizes: Finding Your Perfect Match
Choosing the right shape and size of makeup blender can feel like a quest. Do you go for the classic teardrop, the angled shape, or something entirely different? The answer really depends on your personal preferences and the specific areas of your face you’re targeting. It’s like finding the right dance partner, you want a good fit for optimal performance.
The classic teardrop shape is a great all-rounder. The rounded base is perfect for applying foundation to larger areas like your cheeks and forehead, while the pointed tip is ideal for getting into those hard-to-reach areas around your nose and eyes. This is often a good starting point if you’re new to makeup blenders.
Angled blenders, on the other hand, offer more precision. The flat edge is fantastic for contouring and highlighting, allowing you to create sharp lines and defined features. Think of it like using a chisel to sculpt your face. They’re particularly helpful for those who love a more sculpted look.
Finally, consider the size. Smaller blenders are perfect for detailed work, like concealing blemishes or highlighting the inner corners of your eyes. Larger blenders speed up the application process for foundation on larger areas. Experiment with different shapes and sizes to see what works best for you and your makeup routine.
Wet vs. Dry Application: Mastering the Technique
One of the biggest secrets to achieving a flawless makeup application with a blender lies in knowing when to use it wet or dry. The difference between the two methods can significantly impact the finish and longevity of your makeup. It’s like choosing the right paint brush for a specific painting technique.
Dampening your makeup blender before use is generally recommended, especially for liquid foundations and concealers. When wet, the blender expands and becomes less absorbent, meaning it will soak up less product. This not only saves you money but also allows the makeup to sit beautifully on your skin, creating a dewy and natural finish.
To dampen your blender, simply run it under water until it’s fully saturated, then squeeze out any excess water until it’s just damp. You want it to be moist, not dripping wet. This technique helps to sheer out your foundation, preventing it from looking cakey or heavy. Think of it as hydrating your skin and your blender for a smoother application.
Using a dry blender is best for powder products, such as setting powder or powder foundation. The dry sponge will pick up the powder and distribute it evenly onto your skin, helping to set your makeup and control shine. However, be careful not to use too much pressure, as this can lead to a patchy or uneven application.
Ultimately, the best way to master the wet vs. dry application technique is through experimentation. Try both methods with different products to see what works best for your skin type and desired finish. Don’t be afraid to play around and discover your own personal preferences!
Beyond Foundation: Versatile Uses for Your Makeup Blender
While makeup blenders are most commonly associated with applying foundation, their versatility extends far beyond that one task. Think of your blender as a multi-purpose tool in your makeup kit, capable of tackling a range of different products and techniques. You can use it to streamline your routine and achieve professional-looking results.
For example, makeup blenders are excellent for applying cream blush. Simply dab a small amount of blush onto your cheek and then use the blender to gently blend it out, creating a soft and natural flush. This technique prevents the blush from looking too harsh or concentrated, giving you a healthy, lit-from-within glow.
They’re also great for blending out concealer, especially under the eyes. The soft, bouncy texture of the blender helps to seamlessly blend the concealer into your skin, minimizing the appearance of fine lines and wrinkles. Just be sure to use a light touch and avoid dragging the blender across your skin.
Even powder products can benefit from a makeup blender. After applying your foundation and concealer, you can use a dry blender to gently press setting powder into your skin, locking everything in place and preventing creasing. This technique is particularly effective for oily skin types that tend to experience shine throughout the day.
So, the next time you reach for your makeup blender, don’t limit yourself to just foundation. Experiment with different products and techniques to discover all the amazing things this little sponge can do. You might be surprised at how versatile and essential it becomes in your makeup routine!
Finding Your Holy Grail: A Buying Guide for the Best Makeup Blenders Under $20
Hey there, beauty enthusiast! Let’s be real, achieving that flawless, airbrushed makeup look shouldn’t break the bank. We all dream of a perfect complexion, and a good makeup blender can be a game-changer. But with so many options out there, especially in the affordable category, choosing the right one can feel overwhelming. That’s why I’ve created this guide – your friendly companion on the journey to finding the best makeup blenders under $20 that will elevate your makeup game without emptying your wallet. Get ready to discover your new favorite beauty tool!
Material Matters: Is Your Blender Bouncy or Just Bumpy?
The material of your makeup blender is arguably the most critical factor. You want something soft, bouncy, and non-abrasive against your skin. Think about it – you’re going to be dragging this thing across your face every day (hopefully after cleaning it!), so comfort is key. A dense, hard sponge will not only feel uncomfortable, but it will also apply your makeup unevenly, resulting in streaks and patches.
Look for blenders made from hydrophilic foam, which is designed to absorb water and expand, creating a softer, more pliable surface. This allows the blender to seamlessly blend your foundation, concealer, and cream products without soaking up all your product. A good way to test this (if possible before buying) is to gently squeeze the blender – it should feel springy and return to its original shape quickly. Avoid blenders that feel stiff, rubbery, or have a rough texture. Those are likely to give you a less-than-desirable makeup application. Finding the best makeup blenders under $20 hinges on this material quality.
Shape Up: Choosing the Right Form for Your Face
Makeup blenders come in all sorts of shapes, from the classic teardrop to angled and even miniature versions. The shape you choose depends on your personal preference and the areas you want to target. The teardrop shape, with its rounded bottom and pointed tip, is a versatile option for applying foundation all over the face and reaching smaller areas like around the nose and eyes.
Angled blenders are great for contouring and applying makeup to specific areas with precision. The flat edge can be used to press product into the skin, while the angled side is perfect for sculpting the cheekbones and jawline. Don’t be afraid to experiment with different shapes to find what works best for you. Some people even prefer the mini blenders for applying concealer under the eyes or spot concealing blemishes. With so many options within the budget, you’re sure to find the best makeup blenders under $20 that fit your unique needs.
Size Does Matter: Go Big or Go Home (But Not Too Big!)
The size of your makeup blender can also affect the application. While a larger blender might seem like it would cover more surface area faster, it can also be difficult to maneuver around the face and apply makeup with precision. A smaller blender, on the other hand, may take longer to apply makeup all over, but it offers greater control and is perfect for reaching smaller areas.
Consider the size of your face and the types of products you’ll be using the blender for. If you have a larger face or prefer to apply foundation all over, a medium-sized blender might be the best option. If you have a smaller face or primarily use the blender for concealer and spot concealing, a smaller blender might be a better choice. It’s all about finding that sweet spot! Keep in mind that the best makeup blenders under $20 offer a variety of sizes, so explore your options.
Absorbency Rate: Is Your Blender Drinking Up Your Foundation?
One of the biggest complaints about makeup blenders is that they can soak up a lot of product, leading to wasted foundation and a less-than-ideal finish. A high-quality blender should be able to apply your makeup without absorbing too much of it. This is where the material comes into play again. As mentioned earlier, hydrophilic foam is designed to be less absorbent than other materials.
Look for blenders that claim to be non-absorbent or have a low absorbency rate. You can also test this yourself by applying a small amount of foundation to the blender and seeing how much it soaks up. If the blender seems to disappear into the sponge, it’s probably not the best option. Ultimately, the goal is to find a blender that allows you to apply your makeup evenly and efficiently without wasting product. Selecting the best makeup blenders under $20 means finding that balance of affordability and efficient product use.
Cleaning and Care: Keeping Your Blender Squeaky Clean
Proper cleaning and care are essential for maintaining the hygiene and longevity of your makeup blender. A dirty blender can harbor bacteria, leading to breakouts and other skin problems. Plus, a dirty blender won’t blend your makeup as effectively. Think about all the makeup, oils, and dead skin cells that accumulate in that sponge!
Make sure to clean your blender after each use with a gentle cleanser or makeup brush cleaner. You can also use a solid soap designed specifically for cleaning makeup brushes and blenders. Thoroughly rinse the blender under warm water and squeeze out any excess water. Allow the blender to air dry completely before storing it. Avoid storing your blender in a closed container, as this can create a breeding ground for bacteria. Investing in the best makeup blenders under $20 is only worth it if you commit to proper cleaning and care.
Durability and Lifespan: Getting the Most Bang for Your Buck
Even though we’re talking about affordable makeup blenders, you still want them to last for a reasonable amount of time. Nobody wants a blender that falls apart after just a few uses! The durability of a blender depends on the quality of the materials and how well you care for it.
Look for blenders that are made from high-quality materials and are designed to withstand regular use and cleaning. Read reviews to see what other users have to say about the durability of the blender. With proper cleaning and care, a good makeup blender should last for at least a few months, or even longer. Remember, replacing your blender regularly is important for hygiene, so don’t be afraid to toss it when it starts to show signs of wear and tear. Finding the best makeup blenders under $20 means finding one that provides decent longevity for the price.
Brand Reputation and Reviews: Trusting the Beauty Community
In the age of online reviews and social media, it’s easier than ever to get an idea of the quality and performance of a product before you buy it. Take advantage of this by reading reviews and watching tutorials featuring different makeup blenders. See what other users have to say about their experience with the blender, including its softness, absorbency, durability, and overall performance.
Pay attention to both positive and negative reviews, and look for any recurring themes or concerns. Consider the source of the reviews as well. Are they from reputable beauty bloggers, makeup artists, or everyday users? A brand with a good reputation and positive reviews is generally a safer bet. Don’t be afraid to try new brands, but do your research first to ensure that you’re getting a quality product. Ultimately, relying on the wisdom of the beauty community can help you find the best makeup blenders under $20 that are truly worth your money.
Frequently Asked Questions
What exactly *is* a makeup blender and why should I use one?
Think of a makeup blender as your secret weapon for achieving a flawless, airbrushed makeup look. It’s a squishy, usually egg-shaped sponge that you dampen and then use to bounce (not rub!) your foundation, concealer, and other cream or liquid products onto your skin. Instead of just sitting on top of your skin like makeup applied with a brush sometimes can, the blender helps to really meld the product into your complexion for a seamless, natural finish.
Using a blender helps to avoid those harsh lines and streaks that can sometimes happen with brushes or even your fingers. The dampness of the blender also prevents it from absorbing too much product, which saves you money in the long run! Plus, the rounded shape allows you to easily reach those tricky areas like around your nose and under your eyes.
How do I properly clean my makeup blender?
Cleaning your makeup blender is crucial for both hygiene and the longevity of your sponge! Ideally, you should clean it after every use. This helps prevent the build-up of bacteria, which can lead to breakouts. Don’t worry, it’s not a huge chore!
You can use a gentle soap like baby shampoo, a dedicated makeup blender cleanser, or even dish soap (just be sure to rinse thoroughly!). Wet the blender, apply the soap, and gently squeeze and massage the blender until the water runs clear. Rinse well and allow it to air dry completely in a well-ventilated area. Never store a damp blender in a closed container!
Are all makeup blenders created equal, or are there specific things I should look for?
While all makeup blenders serve a similar purpose, there are definitely differences in quality and features to consider. Look for blenders that are made from a soft, non-latex material. This makes them gentler on the skin and less likely to cause allergic reactions.
Also, pay attention to the size and shape. Some blenders have a pointed tip for precise application in smaller areas, while others are more rounded for all-over coverage. Density is another factor; a denser blender will absorb less product, while a less dense one might feel softer on the skin. Don’t be afraid to experiment to find what works best for you!
How do I know when it’s time to replace my makeup blender?
Even with proper cleaning, your makeup blender won’t last forever. Over time, the material can start to break down, and it might become more difficult to clean thoroughly.
A good rule of thumb is to replace your blender every 1-3 months, depending on how frequently you use it and how well you care for it. If you notice any tears, discoloration, or a lingering odor even after cleaning, it’s definitely time for a new one. Think of it like replacing your toothbrush – it’s an important part of maintaining good hygiene!
I have sensitive skin. Can I still use a makeup blender?
Absolutely! In fact, makeup blenders can be a great option for sensitive skin, especially if you choose a blender made from hypoallergenic materials like non-latex foam.
The key is to make sure you’re using a gentle cleanser to clean your blender regularly and that you’re not rubbing the blender too harshly on your skin. The bouncing motion is key! If you’re concerned, you can always do a patch test on a small area of your skin before using the blender all over your face.
Can I use a makeup blender for powder products?
While makeup blenders are primarily designed for liquid and cream products, you can technically use them for powder products, but it’s not always the best choice.
A dry blender can pick up powder, but it might not distribute it as evenly as a brush would. You could try lightly dampening the blender and using it to press powder into the skin for baking or setting your makeup, but be sure to use a light hand to avoid a cakey finish. Generally, brushes are still the preferred tool for powder application.
What’s the best way to store my makeup blender to keep it clean?
Proper storage is key to keeping your makeup blender clean and preventing the growth of bacteria! The most important thing is to make sure your blender is completely dry before storing it.
Once it’s dry, store it in a well-ventilated area, away from direct sunlight and humidity. You can use a dedicated blender holder, a small mesh bag, or even just place it on a clean towel. Avoid storing it in a closed container while it’s still damp, as this can create a breeding ground for bacteria.
Final Words
Finding your perfect makeup application shouldn’t break the bank! You’ve now got the insider scoop on some of the best makeup blenders under $20, each with its unique strengths to match your specific needs. Think of it – flawless foundation, seamlessly blended concealer, and a naturally sculpted contour, all within reach and budget. It’s time to ditch the streaky lines and uneven coverage and embrace that airbrushed look you’ve been dreaming of.
Armed with this knowledge, you’re ready to conquer your makeup routine like a pro! Don’t overthink it; pick the blender that speaks to you and get ready to experiment. Remember, makeup is all about self-expression and having fun. So go ahead, discover the magic of these best makeup blenders under $20 and unlock your most radiant self!