Remember that time you were scrolling through Instagram, mesmerized by those impossibly intricate nail art designs? Yeah, me too! I spent weeks trying to recreate a galaxy swirl, armed with dotting tools and a serious dose of optimism. The result? Let’s just say it looked more like a toddler attacked my nails with glitter glue. That’s when I realized mastering nail art takes more than just pretty polishes; it takes practice, patience, and the right techniques. I dove headfirst into researching everything from brush control to color blending, determined to finally achieve those salon-worthy looks. And now, I’m here to share all the best nail art practice tips I’ve learned along the way!
This guide isn’t just about painting pretty pictures on your nails; it’s about building a solid foundation of skills that will let your creativity truly shine. We’ll explore essential tools, beginner-friendly designs, and expert-level techniques, all broken down into easy-to-follow steps. Plus, we’ll dive into some top-rated practice products that can significantly speed up your learning curve. Whether you’re a complete newbie or just looking to refine your skills, get ready to unlock your inner nail artist and transform your fingertips into miniature masterpieces!
We will review the best nail art practice tips later in this article. But before that, take a look at some relevant products on Amazon:


Last update on 2026-02-11 / Affiliate links / #CommissionsEarned / Images from Amazon Product Advertising API
From Clumsy Claws to Creative Canvases: Your Nail Art Journey Begins!
Ever looked at those intricate nail art designs online and thought, “Wow, I wish I could do that!”? You’re not alone. Many of us start with the basics, perhaps a shaky single-color manicure or a haphazard attempt at a polka dot. The truth is, becoming a nail art pro takes dedication and, most importantly, practice. Don’t be discouraged if your first attempts aren’t exactly Instagram-worthy. Everyone starts somewhere, and the beauty of nail art is that it’s a skill you can absolutely develop!
According to recent statistics, the nail care industry is booming, with a projected global market size reaching over $15 billion by 2027. This growth indicates that more people than ever are embracing nail art as a form of self-expression, and that opens up a huge world of inspiration. And don’t think you need fancy tools or expensive polishes to begin. You can start simple, focusing on mastering fundamental techniques before moving on to more elaborate designs. That’s where the best nail art practice tips come into play.
Think of learning nail art like learning a new language. You wouldn’t expect to be fluent overnight, right? It’s the same with perfecting swirls, gradients, or stamping techniques. Breaking down complex designs into manageable steps is key. Start with simpler patterns like stripes or dots, then gradually work your way up to more challenging designs. Remember, consistency is key. Even dedicating just 15-30 minutes a day to practice can make a world of difference.
So, are you ready to embark on your nail art journey? This article is designed to be your friendly guide, providing the best nail art practice tips and tricks to help you transform your nails into miniature masterpieces. We’ll cover everything from essential tools and supplies to fundamental techniques and design inspiration. Get ready to unleash your creativity and watch your skills blossom!
Top 5 Best Nail Art Practice Tips
Silicone Practice Hand
Imagine a tool that lets you practice your most intricate nail art designs without wasting product or, even worse, messing up a client’s perfectly manicured nails. That’s exactly what a silicone practice hand offers! It’s surprisingly realistic, with flexible fingers and a texture that closely mimics the feel of real nails. This allows for experimentation with everything from gel polish application to 3D nail art techniques. Plus, the reusable nature of the silicone means you can wipe it clean and start fresh as many times as you need.
The ability to replace the nail tips on these hands is a total game-changer. No more filing down old designs or working around previous creations. Simply pop on a new nail tip, and you’re ready for your next masterpiece! This feature, combined with the hand’s lifelike feel, makes it an invaluable tool for both beginners honing their skills and experienced nail artists looking to perfect new trends.
Nail Art Practice Sheets
These sheets are like the ultimate coloring book for nail enthusiasts! They come pre-printed with various nail shapes, allowing for endless practice with different designs. Think of them as your personal nail art sketchbook, where you can experiment with color combinations, patterns, and techniques without any pressure. They are particularly great for mastering brushstrokes and creating symmetrical designs.
The best part is how portable and mess-free these sheets are. Simply grab your favorite nail art brushes and polishes, and you can practice anywhere – on your commute, during your lunch break, or while relaxing at home. Once you’ve filled a sheet with your creations, simply flip it over and start again! They are an eco-friendly and cost-effective way to boost your nail art confidence.
Reusable Practice Nail Stands
These little stands are a nail artist’s best friend! They provide a stable base for practicing individual nail designs, which is especially helpful when working with small details or intricate patterns. No more chasing rolling nail tips around your desk! The stands come in various shapes and sizes to accommodate different nail lengths and styles, and the magnetic or adhesive base keeps the nail tips securely in place.
What makes these stands truly special is their reusability. Simply apply and remove nail tips as needed, making them a sustainable alternative to single-use options. They’re perfect for creating sample nail art designs to showcase your skills to clients or for practicing new techniques before applying them to a full set. These little stands are an investment in precision and professionalism.
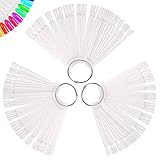
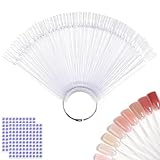
Clear Nail Polish Swatch Sticks
These swatch sticks are like the ultimate color palette for nail art. They allow for the creation of a library of all nail polish colors and effects, neatly organized and readily available for reference. No more guessing how a color will look on the nail or flipping through countless bottles! You can also use them to experiment with different topcoats and finishes to see how they alter the base color.
Beyond color swatches, these sticks also provide a great surface for practicing nail art techniques. Try out different brushstrokes, ombre effects, or stamping designs on the clear surface. Because they are transparent, you can easily see the layers of your design and how they interact with each other. They are an essential tool for any nail artist looking to expand their knowledge and creativity.
Latex-Free Liquid Peel Off Cuticle Guard
This is a true lifesaver for anyone who loves nail art but dreads the cleanup! Applying this liquid latex around your cuticles before creating a design forms a protective barrier, preventing nail polish from staining your skin. It’s like having a personal force field against stray polish! This allows for experimentation with messy techniques like gradients, water marbling, and stamping without the fear of a sticky situation.
The best part is how easily it peels off after you’re done! Simply use tweezers or your fingers to lift an edge and gently remove the latex, taking any excess polish with it. This leaves you with clean, crisp lines and a perfectly polished manicure. Say goodbye to cotton swabs and acetone, and hello to effortless cleanup with this game-changing product!
Why Invest in Nail Art Practice Tips?
Ever dreamed of creating salon-worthy nail art at home but felt intimidated by the thought of ruining your own (or someone else’s!) perfect manicure? That’s where nail art practice tips come in! Think of them as your personal, judgment-free nail art playground. These little plastic canvases allow you to experiment with new designs, techniques, and color combinations without any pressure. It’s like having a sketchbook specifically for your nails, giving you the freedom to explore your creativity and perfect your skills.
Imagine this: you’ve seen a stunning marble nail tutorial online and are dying to try it. But the thought of potentially messing up your freshly polished nails fills you with dread. With practice tips, you can try out the marbling technique repeatedly, playing with different colors and swirl patterns, until you achieve the exact look you’re after. No more wasted polish or frustrated sighs – just pure, unadulterated creative exploration! This builds confidence and allows you to understand the nuances of each technique before applying it to real nails.
The best nail art practice tips are designed to mimic the shape and texture of natural nails, providing a realistic surface to work on. They’re also incredibly affordable and reusable – simply soak them in acetone to remove your designs and start fresh. Think of it as an investment in your skills, allowing you to level up your nail art game without breaking the bank. They also come in different colors and sizes to mimic all types of nails.
So, ditch the nail art anxiety and embrace the freedom of practice tips! Whether you’re a beginner just starting out or an experienced nail enthusiast looking to refine your techniques, these little helpers are an invaluable tool. They’ll save you time, money, and frustration, allowing you to unlock your inner nail artist and create stunning manicures that you’ll be proud to show off. Ultimately, by investing in nail art practice tips, you are investing in yourself and your passion for nail art.
Setting Up Your Nail Art Practice Station
Imagine trying to paint a masterpiece in a cluttered room – it’s a recipe for disaster, right? The same goes for nail art! Your practice station is your creative haven, so setting it up right is crucial. Think about having everything you need within easy reach: your practice hands, polishes, brushes, clean-up tools, and even a good light source. This will streamline your workflow and minimize distractions, allowing you to fully focus on mastering your skills.
Think of a surgeon – they have all their instruments laid out precisely. You, as a budding nail artist, should strive for a similar level of organization. A good practice station can be as simple as a dedicated area on your desk or a portable trolley. The key is to have a designated space that signals to your brain, “Okay, it’s time to create!” No more searching frantically for that one specific brush you need.
Don’t underestimate the importance of good lighting! Poor lighting can make it difficult to see fine details and accurately apply your designs. Invest in a good desk lamp with adjustable brightness and positioning. Natural light is fantastic, but not always reliable, especially if you practice at night or on cloudy days. Proper lighting will prevent eye strain and ensure your designs look as good in real life as they do under the lamp.
Finally, consider investing in a comfortable chair. You’ll likely be spending a fair amount of time practicing, so make sure you’re sitting in a supportive and ergonomic chair. Your back will thank you for it! Think of it as an investment in your creativity and overall well-being. A comfortable posture will allow you to focus better and prevent unnecessary aches and pains.
Mastering Basic Nail Art Techniques
Before you start creating elaborate designs, it’s essential to master the fundamentals. Think of it like learning to walk before you can run. Basic techniques like applying a smooth base coat, creating clean lines, and using dotting tools effectively are the building blocks of more complex nail art. Don’t be tempted to skip ahead – a solid foundation will make everything else much easier.
Let’s talk lines. Straight, clean lines are essential for geometric designs, French manicures, and even outlining other elements. Practice drawing lines of varying thicknesses using different brushes. Try using striping tape as a guide for extra precision. Remember, practice makes perfect! The more you practice, the steadier your hand will become.
Dotting tools are incredibly versatile and can be used to create everything from simple polka dots to intricate floral patterns. Experiment with different sizes of dotting tools and try varying the pressure you apply to the nail. You can even create gradients by dotting different shades of polish together. Don’t be afraid to get creative and explore the possibilities.
Don’t forget about clean-up! No matter how skilled you become, you’ll inevitably make mistakes. Having a small brush dipped in acetone handy is crucial for cleaning up smudges and stray polish. Q-tips are also great for cleaning up around the cuticles. Cleanliness is key to a professional-looking manicure, so make sure you have your clean-up routine down pat.
Exploring Different Nail Art Tools & Materials
Think of nail art tools and materials as your artist’s palette. The wider the range you have, the more creative you can be! From specialized brushes to nail art stickers and stencils, there’s a vast array of options to explore. Experimenting with different tools and materials will help you discover what works best for you and expand your creative horizons.
Nail art brushes come in a variety of shapes and sizes, each designed for specific purposes. Detail brushes are perfect for fine lines and intricate details, while fan brushes are great for creating gradient effects. Experiment with different brush types to find the ones that feel most comfortable and give you the best results. It’s like finding the perfect pen for writing – it can make all the difference.
Nail art stickers and stencils are a fantastic way to create complex designs quickly and easily. They’re especially useful for beginners who are still developing their freehand skills. From floral patterns to geometric shapes, there’s a sticker or stencil for almost any design you can imagine. Don’t be afraid to use these tools to add a touch of pizzazz to your manicures.
Beyond brushes and stickers, there’s a whole world of other nail art materials to explore, including glitter, rhinestones, studs, and foils. These embellishments can add texture, dimension, and sparkle to your designs. Experiment with different combinations and techniques to create unique and eye-catching looks. Just remember, a little goes a long way!
Troubleshooting Common Nail Art Problems
Even the most experienced nail artists encounter problems from time to time. Polish chipping, designs smudging, and bubbles appearing are just a few of the common challenges you might face. The key is to understand why these problems occur and learn how to prevent them. Think of it like being a doctor – you need to diagnose the issue before you can prescribe a solution.
One of the most common problems is polish chipping. This can be caused by several factors, including improper nail preparation, applying too thick of a coat of polish, or not using a top coat. Make sure to properly clean and buff your nails before applying polish, and always use a base coat and top coat. Applying thin coats of polish is also crucial for preventing chipping.
Smudging is another frustrating issue that can ruin your hard work. This often happens when the polish is still wet or when you accidentally bump your nails against something. To prevent smudging, allow each coat of polish to dry completely before applying the next, and be extra careful with your hands until the polish is fully dry. A quick-dry top coat can also help speed up the drying process.
Bubbles in your polish can be caused by shaking the bottle too vigorously or applying too thick of a coat. To avoid bubbles, gently roll the polish bottle between your hands instead of shaking it. Applying thin coats of polish will also help prevent bubbles from forming. If you do get bubbles, try gently tapping the nail with your finger to release them.
Finally, remember that practice is the best way to overcome nail art challenges. The more you practice, the better you’ll become at identifying and preventing problems. Don’t get discouraged by mistakes – they’re a valuable learning opportunity. Embrace the challenges, learn from your mistakes, and keep practicing!
Your Guide to Finding the Best Nail Art Practice Tips
Hey there, future nail art extraordinaire! Ready to take your nail game to the next level? You’ve decided to invest in nail art practice tips, which is a fantastic first step! But with so many options out there, it can feel a little overwhelming to choose the right ones. Don’t worry; I’m here to help! Consider me your friendly guide, walking you through the key things you should keep in mind before clicking that “add to cart” button. Let’s dive in and find the best nail art practice tips for you!
Material Quality and Durability: Will They Stand Up to the Test?
Think about it: you’re going to be putting these practice tips through a lot. They’ll be getting painted, gelled, glittered, and generally abused as you experiment and hone your skills. That cheap plastic might seem tempting, but it could crack easily, stain from polishes, or even melt slightly under a UV lamp. Investing in a higher-quality material like ABS plastic, which is known for its durability and resistance to heat, will save you money in the long run because you won’t have to replace them as often. Plus, nobody wants to deal with a practice tip that flakes off bits of plastic while you’re trying to perfect your ombre!
I know, it’s easy to get caught up in the excitement of all the nail art possibilities, but trust me on this one: prioritize quality. Imagine spending hours creating a masterpiece only to have the tip snap when you try to remove it. Or worse, the polish stains the surface so badly that you can’t even reuse it! It’s frustrating and discouraging. Look for tips that are advertised as durable, flexible, and resistant to cracking or staining. Reading reviews can also give you invaluable insight into how the tips hold up over time with various products and techniques.
Shape and Size Variety: Finding Your Perfect Canvas
Just like real nails, practice tips come in all sorts of shapes and sizes! Are you into the classic square, the elegant almond, or the trendy stiletto? It’s important to choose tips that align with the styles you want to master. A variety pack is a great option to start with because it allows you to experiment and see what shapes you enjoy working with most. Plus, different shapes present different challenges, so it’s a great way to develop a well-rounded skillset.
Don’t underestimate the importance of size either! If you’re planning to offer nail services to clients, you’ll need to be comfortable working with a range of nail sizes. Having a selection of practice tips from small to large will allow you to practice creating designs that are proportionate and flattering on different nail beds. Also, consider the length of the tip. Shorter tips are great for practicing basic techniques, while longer tips give you more space to experiment with intricate designs and embellishments. Having a good mix is the key to finding the best nail art practice tips.
Color and Texture: Mimicking Real Nail Surfaces
While it might seem like a minor detail, the color and texture of your practice tips can significantly impact your ability to create realistic-looking nail art. Bright white tips can be useful for showcasing vibrant colors, but they don’t necessarily mimic the appearance of natural nails. A more natural, slightly off-white or even clear tip can provide a more accurate representation of how your designs will look on real nails.
The texture is just as important. Smooth, glossy tips are easy to work with, but they might not provide the best grip for certain polishes or gels. A slightly textured surface can help the polish adhere better, resulting in a more even and long-lasting finish. Consider looking for tips that have a matte or slightly frosted finish. This can also help prevent the polish from beading up or sliding around, which is especially important when working with intricate designs or detailed artwork. This is where you truly get to experiment with the best nail art practice tips.
Ease of Application and Removal: A Hassle-Free Experience
Let’s be honest, nobody wants to spend hours struggling to attach or remove practice tips. A good practice tip should be easy to adhere to a stand or practice hand without requiring excessive amounts of glue or adhesive. Look for tips that have a slightly roughened or textured back surface, as this will provide a better grip for the adhesive.
Equally important is the ease of removal. You want to be able to remove the tip without damaging it or leaving behind a sticky residue. Some tips are designed to be reusable, while others are intended for single use. If you’re planning to reuse your tips, make sure they’re made from a material that can withstand multiple applications and removals without cracking or breaking. Experiment with different adhesives, such as sticky tack or double-sided tape, to find what works best for you and your chosen practice tips.
Storage and Organization: Keeping Things Tidy and Accessible
Okay, maybe this isn’t the most glamorous aspect, but trust me, it’s important! As your collection of practice tips grows, you’ll need a way to keep them organized and easily accessible. Imagine rummaging through a messy pile of tips, desperately searching for the right shape and size while your creative inspiration slowly fades away. Not fun!
Consider investing in a storage container with separate compartments for different shapes, sizes, and colors. This will not only keep your tips organized but also protect them from dust, dirt, and damage. Some practice tip sets even come with their own storage cases, which is a great bonus. Labeling your containers will also make it easier to find what you need quickly. A well-organized workspace is a happy workspace, and that’s crucial for making the most of your best nail art practice tips.
Price and Value: Balancing Cost with Quality
Let’s talk money! Nail art supplies can add up quickly, so it’s important to find a balance between cost and quality. While it’s tempting to go for the cheapest option, remember what we discussed earlier about material quality and durability. Investing in a slightly more expensive set of practice tips might save you money in the long run because they’ll last longer and provide a better overall experience.
Compare prices from different retailers and online marketplaces to make sure you’re getting the best deal. Look for sales, discounts, and bulk buying options. Consider buying a larger set of practice tips, even if you don’t need all the shapes and sizes right away. This can often be more cost-effective than buying smaller sets individually. And don’t forget to factor in shipping costs! Finding the best nail art practice tips doesn’t have to break the bank, but you need to be smart.
User Reviews and Recommendations: Learning from Others’ Experiences
Before making a final decision, take some time to read user reviews and recommendations. This is a great way to get unbiased feedback from other nail art enthusiasts who have already tried the product. Pay attention to what people are saying about the quality, durability, ease of use, and overall value of the practice tips.
Look for patterns in the reviews. Are multiple people complaining about the same issue, such as cracking or staining? Are there consistent praises for the product’s durability and ease of use? Don’t rely solely on star ratings; read the actual comments to get a more nuanced understanding of the product’s strengths and weaknesses. Consider checking out nail art forums or social media groups to see if anyone has posted reviews or shared their experiences with the practice tips you’re considering. Learning from other people’s experiences is invaluable when choosing the best nail art practice tips.
FAQs
What’s the best way to practice nail art if I’m a total beginner?
Don’t worry, everyone starts somewhere! The best advice for beginners is to start simple. Focus on mastering basic techniques like applying a smooth base coat, creating straight lines, and painting simple dots or stripes. Practice these fundamentals on nail art practice hands, silicone mats, or even just paper before moving onto more complex designs.
Remember to be patient with yourself! It takes time and practice to develop the coordination and skills needed for intricate nail art. Don’t get discouraged if your first few attempts aren’t perfect. Just keep practicing, and you’ll see improvement over time. Watching online tutorials can be incredibly helpful too, as you can visually learn the techniques and get inspiration.
I keep messing up the cleanup around my nails. Any tips?
Cleanup is definitely a common challenge! A great tip is to use liquid latex or a peel-off base coat around your nails before you start painting. This creates a barrier that you can easily peel away after you’re done, removing any polish that got on your skin. You can find these products at most beauty supply stores or online.
Another trick is to use a small, angled brush dipped in acetone or nail polish remover. Gently swipe around your nails to clean up any stray polish. Be sure to use a light touch and avoid pressing too hard, as you don’t want to smudge the design on your nails. Q-tips are okay, but sometimes they can leave fibers behind!
What kind of tools do I *really* need to start practicing nail art?
You don’t need a huge, expensive kit to get started! The essentials include a good base coat and top coat, a few different nail polish colors (start with classics like red, white, and black), a thin nail art brush for detailing, dotting tools (or even just toothpicks!), and some nail polish remover for cleanup.
As you progress, you might want to invest in more specialized tools like striping brushes, fan brushes, or stamping plates. But for beginners, keeping it simple is best. Experiment with different techniques using basic tools, and then expand your collection as you discover what you enjoy and what works best for you.
How can I prevent my nail art from chipping so quickly?
Ugh, chipping is the bane of every nail art lover’s existence! The key is proper preparation and sealing. Always start with a clean, dry nail. Gently buff the surface of your nails to create a smooth base for the polish to adhere to. Apply a quality base coat – this not only protects your nails but also helps the polish grip better.
And don’t forget the top coat! A good top coat seals in your design and adds a layer of protection against chipping and wear. Apply a generous layer and reapply every couple of days to keep your nail art looking fresh. Also, avoid using your nails as tools – wear gloves when doing dishes or cleaning to prevent them from getting damaged.
What are some easy nail art designs I can try as a beginner?
There are tons of easy and fun designs you can try! Polka dots are super simple and can be done with a dotting tool or even a toothpick. Stripes are another great option – you can use nail art tape to create clean, straight lines. Gradient nails are also surprisingly easy to achieve with a sponge.
Another idea is to try simple geometric shapes like triangles or squares. You can also experiment with different color combinations and textures. Don’t be afraid to get creative and have fun with it! The beauty of nail art is that it’s a way to express yourself and your personal style.
Are practice nail art hands worth it?
Practice hands can be a really helpful tool, especially when you’re first starting out. They allow you to practice your techniques and experiment with different designs without having to worry about messing up your own nails. It’s a great way to get comfortable with the tools and techniques before applying them to your real nails.
However, it’s important to remember that practice hands aren’t exactly the same as real nails. The surface and texture can be different, so the experience won’t be entirely realistic. Still, they’re a valuable resource for building your skills and confidence. Plus, you can keep your real nails looking perfect while you’re experimenting!
How do I come up with new nail art design ideas?
Inspiration is everywhere! Start by browsing online platforms like Pinterest, Instagram, and YouTube for nail art tutorials and design ideas. Look at different styles, colors, and patterns to see what catches your eye. Don’t be afraid to draw inspiration from other sources too, like nature, fashion, or art.
Another fun way to get inspired is to try recreating designs you see on celebrities or in magazines. Or, you can challenge yourself to come up with your own unique designs based on your personal style and preferences. The more you experiment, the more creative you’ll become! Don’t be afraid to try new things and see what you can come up with.
The Bottom Line
So there you have it! Armed with these best nail art practice tips, you’re well on your way to transforming your fingertips into tiny canvases of creativity. Don’t be afraid to experiment, embrace mistakes as learning opportunities, and most importantly, have fun! The world of nail art is waiting to be explored, and your unique style is ready to shine.
Now go forth and conquer those cuticles! Choose the tools and techniques that resonate with you, and remember that practice makes perfect (or at least, pretty darn good!). With a little dedication and a lot of passion, you’ll be creating stunning nail art that turns heads and boosts your confidence in no time. Get ready to unleash your inner artist – your nails are calling!